MG-Cars.com
Triumph TR6 Water where it shouldn't be... BBS discussion at MG-Cars.net

MG-Cars.net
Welcome to our resource for MG Car Information.
Recommendations
Parts
TR parts and Triumph parts, TR bits, Triumph Car Spares and accessories are available for TR2, TR3, TR3A, TR4, TR4A, TR5, TR6, TR7, TR8, Spitfire and Stag and other TR models are available from British car spares and parts company LBCarCo.
Triumph TR6 - Water where it shouldn't be...
| I finally started on the winter project on Friday night. I had been spraying the head studs with Kroil for a week and finally decided to see how far I could get with the head removal. It was raining heavily, so I decided to hold off on draining the coolant until I could do it outside - I always seem to spill some and it is easier to clean up outside. It turns out that my head studs were surprisingly easy to remove. I had all 14 out in under an hour. Pleased with myself, I headed to bed. No time to work on the car on Saturday, so I returned today, pushed the car out into the sunshine, removed the bottom hose and only about half a gallon came out. Odd, I thought. That's when it hit me - with nothing but gravity holding the head on there was nothing to stop the water in the thermostat housing down to head gasket level emptying through the gasket, and that's what it did. When I got the head off this afternoon there was half an inch of water in the four cylinders with the pistons low. When I drained the sump I found a lot of water with the oil. To make matters worse, without thinking what I was doing I turned the engine over in an attempt to break the head loose. This was before I drained the sump, so I pumped the water/oil mixture - my hope is that I didn't get it as far as the crankshaft because it was just two very short bursts and I have a larger than average oil filter. I did all I could to get the water out and after drying as well as I could I sprayed WD40 onto the cylinder bores - I figure it should disperse any remaining water, but where it would go is beyond me. So, what damage have I done? Will I get away with it? It looks like the cylinder bores are fine - no sign of any scoring or even any wear as far as my finger nail can tell - it would be a shame to have to get the block machined and buy new pistons just because I am an idiot! My plan was to leave the block in place and replace the main/rod bearings and thrust washers. I was going to replace the rings, but given the great condition of the bores my plan was to leave them alone - maybe I should revise that idea after this weekend... I realised too late that I hadn't done a compression test before starting to dismantle things. I was right about number one exhaust valve, though - it has worn well into the head and I just hope that it hasn't gone too far to be fixed with a new seat. Sorry about the long post. Any thoughts or comments would be appreciated. Cheers Alistair |
| A Hewitt |
| You robably didn't destroy anything, yet. What I would do it remove the sump, clean out all of the mayonnaise in the sump, get the engine back together quickly, and run it with oil in it to get it up to temp, and give an oil and filter change after about 10 minutes running time. With a little luck, that's all you need. Tip: don't re-use the head nuts, get new ones. Al Christopher |
| A R Christopher |
| Alistair, I don't see that you'll have any problems. You'll only see damage to an engine that's run with coolant in the oil. Just turning it over for a few seconds won't hurt anything. However, I would remove the oil pump and clean / oil it before any corrosion MIGHT start. If you left it with coolant in the bores for 20 years like a customer of mine did - then you'd have a problem! Tom |
| Tom Sotomayor |
| Alistair, As said above you're probably ok. The only real bad thing that could have happened was a piston in a cylinder with water in it coming up on compression when you turned the engine over with the starter. Since water can't compress the crank stops abruptly and a rod is likely bent. You would know if that happened because when you cranked it would have stopped dead on you. As far as water in the block and cylinders, again you're probably ok because the coolant has some lubricating properties so I don't think it would rust and I don't think you would have scored the cylinder walls. The engine shop that did the machine work on my engine told me to wash the block with soap and water prior to assembly. It's a common practice and you just have to coat it with oil after blowing out the water. You covered it with WD40 which is fine. Hope that helps Henry |
| HP Henry Patterson |
| Henry, I doubt he bent a rod since he was turning the engine over to free the head and (I assume) the head retaining nuts had been removed. Any 'hydraulic lock' would have just forced the head up and off the block, relieving any pressure. An old trick is to wind in some rope into a cylinder and then turn the engine over to free the head. A word of caution though - WD40 is intended for water displacement only. It is not intended for, nor particularly good at, rust prevention. Use a good rust preventative like LPS 2, motor oil, grease, etc. instead. Tom |
| Tom Sotomayor |
| Thanks guys - I feel a bit less worried now. I think I will go ahead and replace the rings as a precaution, and since I am putting new bearings in it doesn't look like all that much more work, at least looking at the manual... I will get some oil spread on the cylinders today to replace the WD40 - good point there, Tom. I was given a load of WD40 when I bought the car and it has been gathering dust ever since. I was actually quite exciting to have some water to displace at last! I am hoping to get the head off to the machine shop today - they promise it will be ready next day, which seems unlikely, but I am not going to complain if I get it back next week! Right, back to reading the workshop manual...erm, I do of course mean work! Cheers Alistair |
| A Hewitt |
| Alistair There is a procedure in replacing the lower end bearings if you do not plan on dropping the crank. Yes with the bottom pan off and replacing the bearings and the head off you are right there for replacing the rings. you WILL need to de-glaze the cylinder walls though. I agree, you did not do any damage. BACK IN A DAY...man that is fast or he has no work. Rick OH YA...remember to measure your end float before you start to pull everything apart...you MUST not forget this one:) |
| Rick Crawford |
| Thanks Rick I just ordered a dial gauge to check the end float. A few parts stores around here say they have dial gauges to loan out, but nobody seems to want to lend me one. Oh well, I guess I will find uses for it once I have it in the toolbox! Once I measure the end float I will have to look at the files on the CD to work out how to size the thrust washer. I was planning to get the uprated one from Scott Helms - anyone bought one of these lately? To deglaze the cylinder walls I have a cylinder hone - is that all I need? Any tips to avoid damaging the engine? I have pistons all marked "B", so they are slightly larger than the basic standard size, but I assume standard rings will fit okay. Any advice for the brand of rings to buy? Anything else I am forgetting? Do I need new bolts for rods and mains? Thanks, as always! Alistair |
| A Hewitt |
| Hi Alistair Her's something I typed a few years ago about end float..... WITH THE ENGINE OFF..use a bit of wood and carefully make sure the crank is pushed back then watch it as a helper pushes in the clutch..there should be barely any play as it moves forward..the more play the thicker thrust washer is needed. This can be done without a gauge..use a bit of wood with some reference marks and held firmly to the frame Charlie |
| Charlie B. |
| Charlie That's an interesting idea to get the end float - I wondered about using a feeler gauge behind the pulley (along with some sort of packing, I guess), but figured that I would really struggle to get am accurate measurement. Doesn't sizing the thrust washers require a measurement to within 0.001 inch? My thinnest pencil has 0.5mm lead, which on its own is is about 4 times thicker than the acceptable end float, so I don't know how I would mark the wood? It is just a question of interest now, though - I just checked and the gauge has shipped, so I guess I will have another tool to play with! Just to check this, are the thrust washers at the rear mean bearing or the third one from the front? I don't know why I am confused, but I am! Cheers Alistair |
| A Hewitt |
| If your pistons are all marked B, This (at least in the tactor engine cars, like mine) means that you still have the original factory matched and balanced pistons in the engine Conratulations! Al Christopher |
| A R Christopher |
| Alistair-You will also need a ridge reamer to remove the "step" at the top of the cylinder bore. If it isn't removed the rings will catch and possibly break as the pistons are removed or installed. Berry Price |
| BTP Price |
| Alistair Yes you definitely need to measure with a dial indicator. I think Charlie was just giving you a rough look at "if you need to replace or not". I would replace period! if you are up over 40,000 Miles. You will need a magnetic base to hold the dial indicator as you make your measurements. My memory has gone on how to size them. I think there is an article on the CD re this. In any event Scott will help you out. Give him end float number and the measurement ( thickness) of both thrust washers. I would replace both. Thrust washers are at very back main bearing. After checking end float use a "tye Wrap" to push the washers around the crank then you can grab them with needle nose pliers. If you own a cylinder hone then I presume you know how to use it. Yes that is all to be done other than scrapping the carbon crap off of the top of the pistons and getting rid of the carbon lip at the very top of the cylinder bore. I did not replace my bolts for rods or mains but did put them back exactly where they came from. Rings??? I used BPNW to buy all parts for the rebuild including the VP2 bearings (NOTE: these are not the standard bearings that BPNW sells...the VP2s are a premium). I am hearing that most suppliers are now offering the VP2 bearings. You will need to check your bearings to see if they are "STD" size. Will be stamped right on the bearing case itself and if OE will be stamped with VP2. Head bolts MUST be new and you may as well order both upper and lower gasket set. Replace both front and rear main seals ( direction is important) Have fun on your back! Rick 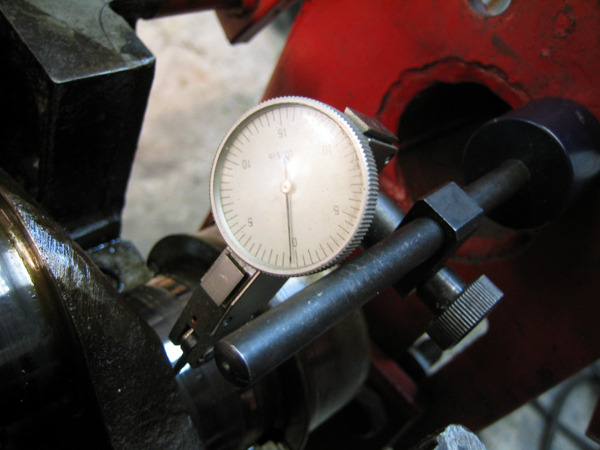 |
| Rick Crawford |
This thread was discussed between 29/10/2007 and 30/10/2007
Triumph TR6 index