MG-Cars.com
Triumph TR6 Engine Questions BBS discussion at MG-Cars.net

MG-Cars.net
Welcome to our resource for MG Car Information.
Recommendations
Parts
TR parts and Triumph parts, TR bits, Triumph Car Spares and accessories are available for TR2, TR3, TR3A, TR4, TR4A, TR5, TR6, TR7, TR8, Spitfire and Stag and other TR models are available from British car spares and parts company LBCarCo.
Triumph TR6 - Engine Questions
| I am hoping to get my engine out of the car in the next couple of weeks, and I am a bit confused about a few things, so hopefully some of you chaps can help me out... 1. I bought an engine stand - it has a stated capacity of 1000 lbs, so hopefully no problem with the weight, (even allowing a 50% "cheap Chinese junk" factor). I don't see any problem with using four decent quality 5/16"x 4" bolts to mount the engine to the stand, and that seems to be accepted practice. Here's the thing - all the pictures I have seen of TR6 engines attached to a stand have the engine attached with bolts through the back plate, which is all well and good, but how do I get the crankshaft out with the back plate in place? Is the block with crankshaft and back plate light enough to be removed from the stand? Seems like most of the weight is still there. If I remove the back plate with the engine still on the crane, then can I just bolt through to the back plate mounting holes? 2. Should I remove the flywheel before mounting to the stand? If so, how? Impact wrench? 3. I ordered a set of core plugs, but now I am wondering whether they are supposed to be removed by idiots like me - is that a job for a machine shop? I would hate to get the engine back together only to find the core plugs start leaking... I don't think I need a rebore, but should I take the block to a machine shop to have the head mating surface skimmed to make sure it is true? Is it worth having them boil the block out (or whatever the right term is?) 4. Fasteners - I usually replace any fasteners I remove with new ones, but some of the more "specialised" fasteners (flywheel attachment, for example) can't be picked up at Fastenal or McMaster Carr - what's the best bet - reuse? They have lasted 30+ years, so does that mean that they are good to go for another 30 years, or is it time for them to retire? 5. I found a few pictures of people removing Triumph 6 cylinder engines, but none seemed to be using the lifting eyes - I was planning to use those eyes - is there something I should know? That's about all I can think of for now - no doubt more stupid questions will come to me as I progress. As usual, any help and advice will be gratefully received. Cheers Alistair |
| A Hewitt |
| Fly wheel bolts ARP! I used my eyes Have the machine shop do it (plugs). |
| DON KELLY |
| I use the lift eyes also and like to pull engine/transmission as one unit. My general procedure is to remove the bonnet and then disconnect everything in the engine compartment. I then pull the interior stuff out and disconnect all the stuff from the transmisson alnong with removing the shifter. All of this work is done on the floor and then raised onto stands as high as I can get things to go. Next step is to remove the front wheels and lower the car in the front to where the suspension and brake discs just clear the floor, but I can still get the arms of the engine hoist under the frame. This pretty much puts the rear of the transmission on the same plane with the top of the radiator support. Coming in from the front with the hoist, The engine and transmission are then lifted and pulled out over the top of the radiator support. You should be able to find a lift point that will let the transmission droop slightly for the removal. As for the flywheel bolts, I second the ARP call and would also recommend new bolts for the rods and mains. If you are building a "stock motor" or warmed over motor the factory stuff is fine. If on the other hand you are building a fire breather, go with ARP stuff there too. Unless corroded or stretched the head studs should be OK, if not same recommendations, stock is fine, but fire breathers should get ARP hardware. |
| Steve Pike |
| Alister, Like Steve advised, get the front end down and the back up...way up and the engine will come out smoothly. Use the eyes and have at least one other person with you. db |
| Doug Baker |
| "Use the eyes and have at least one other person with you. db" Now you tell me. Pulled mine by myself. I think I lost any chance of going to heaven with all the language I used. |
| DON KELLY |
| Don Pulling an engine by yourself is difficult especially if the tranny is attached. Now that I think about it, pulling engine and tranny would almost be impossible by ones self. Alistair, yes use the eye hooks. The back plate is off the engine when on the stand. "If I remove the back plate with the engine still on the crane, then can I just bolt through to the back plate mounting holes?" YES see the attached pic. As you can see the crank can be removed very easily now. The head is off by the way. #2 Flywheel must be off in order to mount to engine stand. I wedged a piece of wood down the crank shaft and engine block then got a big long "helper" for a BA socket wrench. Same procedure for the front pully...this one is on tight! #3 Your choice on removing the frost plugs. they will need replacing so remove them if you want. Make sure you got ALL the frost plugs in your purchase...there are 2 or 3 on the front face of the block. You do not need to line bore. Only necessary if you change one of the main caps. Make sure you DO NOT mix up the position of any of the caps...they are marked in any event. Shaving the head will increase compression slightly. I did not have my (engine's) head shaved. If you are going to dip the block, which is a good idea, then you need to strip it down totally. You will need a complete upper and lower gasket set. Front and rear seals go one way only. Use plenty of assembly lube. #4 Yes I would use new bolts. My head studs where stretched from the first time I took the head off....not sure I want to admit that. Go tri-metal bearings (VP2). #5 have fun! I have many more pics of the engine stand mounting if this one is not clear as to which holes to use in the block. Rick 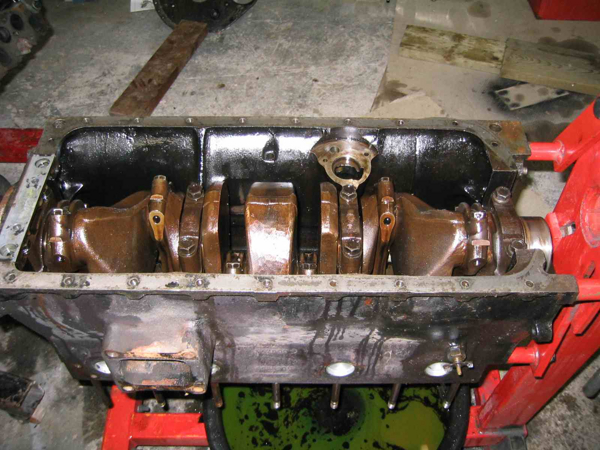 |
| Rick Crawford |
| To make pulling the engine easier, get an engine 'load leveler'. I've pulled somewhere close to 100 engines/trannies with mine, including from TR6s and always did it solo. No drama at all, seldom any choice words either. The car can be left on all 4 wheels, no need to jack up or drop either end. I do use the lifting eyes when they're there. They're available from Horrible Freight for about $40, less when on sale. I've removed the hand crank handle from mine and use an impact wrench to drive it. It adjusts very quickly then! Tom |
| Tom Sotomayor |
RE: Core plugs, install the new ones with 2-part epoxy, coat the inside (h20 side) with the epoxy & drive in with a large socket (there is aspecial tool of course! I installed a tr4 engine/trans by myself using ropes to rear of the engine to steer it into place Russ |
| R.F. Marx |
| Thanks for all the advice guys Rick - any other pictures you have of the engine removal/stand mounting would be gratefully received - I think you know the e-mail address. I bought a load leveller - just arrived today and I can barely lift it! - made of 1/2 inch thick steel plate. I will be doing this alone, unless someone wants to pop over to help me... Sorry to ask so many questions, but on the basis that the most stupid question is the one I don't ask, and just to make sure I understand this... I will get everything disconnected, hook up the load leveller to the lifting eyes (I guess tho 7/16 inch grade 8 bolts I have in my toolbox will do?) take the weight with the crane and then disconnect the engine mounts, remove the gearbox mount. Then tilt the back down, lift enough to clear the grille and push/pull the car and crane apart. It looks like removing the sump and oil pump would make this a lot easier - does that make sense? Once the engine and car are apart, lower onto a makeshift (wooden?) support and remove the gearbox. Then how do I get underneath to stick wood between the crank/block to allow me to unbolt the flywheel and rear plate? Unless I have already removed the sump, of course. It seems that I will want to put the sump and oil pump on before reinstalling the engine, so maybe the sump should stay put to protect the crank? A quick look at my stand suggests that it would probably be easier to bolt the engine to the rotating part of the stand and then lift that onto the main part of the stand. How long should the bolts be to hold the engine to the stand? The rear plate is held on by 7/8 inch long bolts, so I guess the depth of the stand plus 3/4 inch should be plenty? I have new rings, tri-metal bearings, full gasket set, new camshaft, timing chain, oil pump, fuel pump rebuild kit, rebuilt distributor, ARP head studs, camshaft plate, I even have shims for the crank chainwheel. My head is already rebuilt and waiting in the boot for me to get the rest of the engine sorted out. What am I forgetting? Other than new pistons (I really hope that the old (original) ones are okay) and some fasteners, that is. Any way to know if the water pump is on its last legs? Thanks again for all the help and advice - I wouldn't be attempting this if I didn't have you guys to call on! Cheers Alistair |
| A Hewitt |
| Hi Alistar, Just pulled my motor a couple of months ago using a heavy chain and a 1000# come along tied to an over head beam. I got one of those $39 engine stands from AutoZone. Couple of things, when using the lifting eyes, make sure your chain is long enough to clear your oil cap on top of the valve cover. I had to rest the motor on the ground so I put two jack stands under the side motor mounts and a block of 4x4 wood at the rear of the oil pan. I don't recall any problems with getting the flywheel off, you can use two ratchets opposing each other to break the bolts free. I removed the back plate and attached the mounts for the engine stand directly to the block. Since it is not a V8, you need to be creative on attaching the arms to the back of the block. Imagine yourself standing up straight with your arms tightly to your side then you'll get the idea on how the arms are positioned. You are correct about the length of the 7/16 (UNF) bolts however, the diameter of the hole they go thru on the stand is huge. I think I was able to press in a couple of washers or nuts in the tube to take up the slack in the diameter. Let me know if you need any pix. One other tip, I took a piece of cardboard and drew an outline of my bell housing and then punched 10 holes on either side so I could keep track of the bolts that where removed from the engine. TC |
| Tom C |
| Alistair, I did the same thing last winter, I just put the engine on the floor, with most of the weight still being supported by your hoist. Make sure you put some rags under the oil pan. Pull the tranny. After that I supported the engine on my workmate portable bench. Still with most of the weight on the hoist. Put a piece of 2x4 under the front and remove the flywheel and what ever. Then put it on the engine stand and go to work. Rob |
| rw loftus |
| Alistair, Grade 8 bolts won't really be necessary, but they won't hurt either. Just make sure you draw the bolts/nuts up tight. If the bolt bends, it will likely break. Using the leveler you will be able to tilt the engine/trans at least 60* from the horizontal. That should be plenty to clear the various parts of the car. It gets a little monotonous sometimes: lift a bit, tilt a bit, lift a bit, tilt some more, etc.... Leave the sump on, it will protect the oil pump & screen. Once on the floor and the gearbox removed you can tackle the flywheel. If you have an air impact gun, use that. Otherwise use a 1/2" breaker bar and a deadblow hammer to remove the flywheel bolts. Don't use a ratchet handle with a steel hammer, you can break teeth in the ratchet mechanism. If your water pump didn't leak before it should be ok as long as the impeller shaft is tight. If you can get any appreciable up/down movement when you grab the pulley end - replace it. Otherwise it should be fine. If you have to replace the water pump, run it dry for a couple of minutes to seat the seal. I usually do this in my lathe, but the same thing can be done with an electric drill. Tom |
| Tom Sotomayor |
| Forgot to mention - NEVER, NEVER, NEVER work on any part of the engine while it's suspended from the engine hoist! Stand well clear and make sure nothing of value (yourself included) is underneath at any time. Years ago a buddy was putting an engine back in a car when the lifting eye mount on a 4 cyl. engine broke. CRASH! Luckily, neither one of us was underneath and it only dropped from 3-4". Even so, it made a real mess of the oil pan. But it could have been much worse. |
| Tom Sotomayor |
| Alistair Not much to add as everything is covered. I might suggest to loosen the front pulley while the engine is still in the car. I do not think the fan needs to be removed first. The rad yes. "It looks like removing the sump and oil pump would make this a lot easier - does that make sense?" Yes...more clearance. Put a small screwdriver in the back engine bolt holes to see how deep they are for your bolt lengths. Do not take stand apart. Use the engine hoist to lift it up to the stand. I have sent more pics to your e-mail address. What are you forgetting? You need to check your end float of the crank for new thrust washers before disasssembly of engine. Also pics sent to you. Remember ...keep everything in order If push rod #1 comes out of position #1 then it needs to go back there (#1). Rick |
| Rick Crawford |
| Alistair, I'm another one of those lucky guy's that has rebuilt his TR6 engine.. It really isn't too bad. Just take your time and ask lots of questions. I learned many things along the way.. I spent an entire winter and did alot of research while doing it. So just keep asking. Also, I have a spare complete engine on a stand and if needed I can take pictures for you of sections that you may need to reference. Good luck Henry |
| HP Henry Patterson |
| Hello again guys Thanks for all the advice and encouragement. I still haven't managed to get the engine out - everything's disconnected now, but I still have to do the gearbox end of things. Maybe one of these days I will get some time to play in the garage... I am hoping that I can at least loosen the big bolt at the front of the crankshaft (in the fan extension) before I remove the engine. I know someone mentioned using an impact wrench, which I can do, but I wanted to check how I should go about this - should I engage a gear and have someone hold the brakes, or leave it in neutral? It seems to me that if I have a gear selected then there will be a lot of impact on the gears - I try to engage gear smoothly when I am driving, so hammering away with an impact wrench seems like a poor plan - there is also the risk of being run over, though I suppose I could use reverse. With the gearbox in neutral I would think that the engine will just spin backwards without loosening the bolt. Am I over thinking this? I have an impact wrench but I have never actually used it in anger. Thanks in advance for any tips! Cheers Alistair |
| A Hewitt |
| Alistair, An impact wrench is your friend! You don't need to put the gearbox in gear, the impacts will knock it loose all by itself. Inertia will keep the engine from turning over to any significant degree. Tom |
| Tom Sotomayor |
| Hi guys Hope you all had a good Christmas. I finally found some time to get the engine out of the car and I now have it pretty much stripped down to a bare block. There was a lot of sludge in the sump, but on the plus side, this held the missing rocker shaft screw pretty firmly so it didn't get sucked up by the pump! I am pretty pleased with what I found (except for the sludge!) since the bearings are all std size and even the thrust washers don't look badly worn. The main and rod bearings are a little worn - showing a copper colour in places, but I think that is okay - am I wrong? Just to check, there should be a "channel" in the main bearings, but not the rods, right? Of course, something has me stumped. How do I remove the woodruff key from the crankshaft? It is stuck in there pretty solidly. I suppose I can take it to a machine shop, but I wasn't planning to have any work done to the crank since it looks to be in pretty good shape. Also, does anyone know how much the bare block weighs? I had to replace the rear cover to mount the engine to my stand - the only way I could get the mounting plate to connect to the block involved a lot of washers for spacing and I wasn't happy with it. Maybe it would have been fine, but I elected to put the rear cover back on. Now I can't remove the crankshaft because the rear end is poking through the rear plate... I plan to knock up some sort of wooden frame to hold the block while I remove the back plate and crank, but thought I should check what sort of weight I am dealing with first. I am guessing 250 lbs with the crank? Can I just lift the block with the engine hoist by screwing the chain to the sump bolt holes? Then I could put it down on a much lower wooden frame for cleaning and if it is light enough just carry it to the car, outside or wherever the cleaning will take place. The block alone looks "light" enough that a man of my size should be able to move it without too much trouble. Given the amount of sludge (a good 1/2 inch thick and the consistency of tar in the sump) I want to clean out the oil passageways as thoroughly as possible. Should I just find a machine shop to dip it, or will a pressure washer do an acceptable job? Any other ideas/tips? Cheers Alistair |
| A Hewitt |
| Alistair, It's always a good idea to have the crank shaft checked at the machine shop to be sure the journals are within tollerance. Copper spots on a bearing often indicates the journal is out of round. Most often there's no charge to check the crank. Also, I'd have them mic out the block to be sure that the cyclinders are not tappered or out of round. Wil |
| wg miller |
| Getting Woodruff keys out can be more fun than it's worth, but I usually make a tool out of hardwood (maple works about the best) and use this between the W key and the BFH to get it out. |
| A R Christopher |
| I have found that diagonal pliers or wire cutters are the weapon of choice to remove woodruff keys. Berry Price |
| BTP Price |
| Alistar, Don't be to worried about copper showing thru' the bearings..that's only a wear indicator and it sounds like yours are on the good side of the gauge ! Triumph recommends to change them at 60k as I recall, I checked mine at that milage and even though they showed some copper my mechanic said they had lots of miles left, I changed them anyway since I had them out, yes there is a groove on the bearings for oil to get in... as for the sludge..if it's a fine / smooth greyish goo then that's normal for an engine that's been together for many many years. Since it's apart replacing everything is obvious and you will have a nice tight engine with good oil pressure Have fun Charlie |
| Charlie B. |
| Alistair I agree with Charlie. Since it is apart, then do it all. Everything might look OK but since you have it apart, do yourself a favour and replace everything. REMEMBER you need to have the crank still in place (and the thrust washers in place) to measure the thrust washers. Yes Mains bearings have oil grooves and rods do not. Some how you need to put the engine on the stand without the end plate. It can be done. You are going to need the end plate off so as to be able to remove the rear oil seal housing to change the rear oil seal and the gasket. I recall it took a little head scratching to get the 4 mounting points correct. I hoped my pics I sent you would of helped in locating the motor block on the stand. The attached pic shows the mounting points I used. NOTE: rear seal housing is removed before it goes on the stand. Obviously the head and all external parts where removed. The block without the head would require 2 chaps to lift it just because of its size. With the crank out, one person could easily lift the block....again easier with 2 chaps just because of size. I would consider replacing the oil pump also..it is not that expensive. ( The pump would never have suck up the screw.) I also had a good deal of solid sludge in the pan. I am not sure why you want to remove the key if you are not planning to do any work on the crank IMHO I would think you are better off to have the bare block dipped. It is not just the oil passages you want cleaned out but also the coolant passages. Hope you are havin' fun. Rick 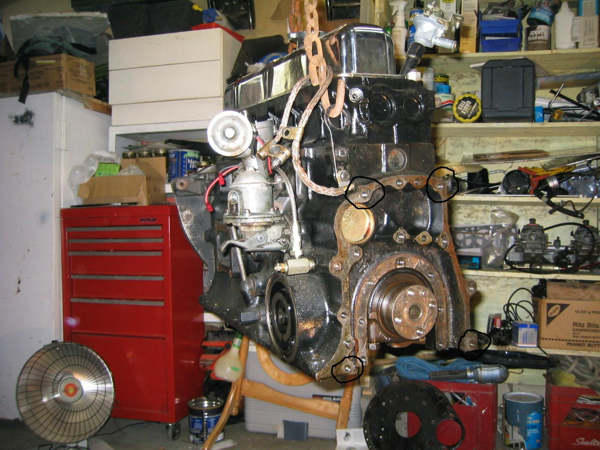 |
| Rick Crawford |
| I am having a lot of fun - I am just being frustrated by my lack of time! On Thursday night I got the block off the stand and removed the crankshaft. Spent a couple of hours with every cleaner I could lay my hands on and got off as much of the baked on grease and dirt as I could. I decided that I should get the core plugs changed so I took the block to the machine shop yesterday morning, then got it back in the afternoon. Impressive turnaround time! It is really amazing how clean the block looks now. I hope to have enough time to get it painted this weekend. I also had them hone the cylinders because I was not sure what to aim for there - they are a lot rougher than I would have gone for, so probably a good thing I got a professional involved! I wanted to remove the key because like an idiot I mangled one of the shims behind the crank sprocket... I don't have a new sprocket to compare to, but the old ones look to be in good shape - though the chain seems to have stretched a bit. I have a new chain and tensioner and given the hassle involved in replacing the sprockets I suspect I will splash out for new ones. Thanks for the picture Rick - those were the points I tried to mount to, but the stand just wouldn't seem to cooperate. In the end I took off everything up to the rear seal housing with the block on stands, and then replaced the back plate to attach to the stand. I think for reassembly I will start with the block on some big blocks of wood and replace the crankshaft, rear seal, rear plate and maybe even the flywheel, then bolt up to the stand so I can do the rest. Speaking of rear plates, and front plates for that matter, can anyone tell me where the paint goes and where to leave plain cast iron? I don't want paint flaking into the oil, but I want to paint as much as is practical. I have POR15 engine paint which seems pretty hard wearing from the comments I have seen online. The end plates were painted both sides as far as I can tell - is that the way to go? What about the block above the rear seal? Front of block under the timing cover? Oh, and on the timing cover area, when I removed the large gasket I found that the gasket was covering parts of the holes to the crankcase - is that right? Should I trim the new gasket to allow oil to pass more easily to/from the sprockets/chain? Thanks again for the help and advice. Cheers Alistair |
| A Hewitt |
| Alistair, Make sure all of the oil galley passages in the block are clear of any debris that may have lodged in them. Even if the block was dipped, there could be some stuff in there and the last thing you want is a blocked passage. If they did any machining of the block then you need to clean out those passages to remove any metal fragments that may have gotten in there. Since mine was machined I ran a bunch of cleaner throungh the passages and use a long skinny brush. Keep us posted. Henry |
| HP Henry Patterson |
| The key can be removed using a small punch and hammer. Keep the punch 90 degreess to one end of the key and tap it out with a hammer. Once the key has rotated out some grab it as suggested by Berry with wire cutters. Again, I'll suggest you take the crank to have it checked, just to be sure. Bring the specs with you and most shops won't charge you. Wil |
| wg miller |
| "Even if the block was dipped, there could be some stuff in there and the last thing you want is a blocked passage. If they did any machining of the block then you need to clean out those passages to remove any metal fragments that may have gotten in there." Originally posted by HP Several years ago we were trying to get a friend's car ready for the VTR National in Colorado. Turns out that he did not perform a post machine shop cleaning prior to building the short block. We finished the engine assembly, installed it, filled with fluids and went for a test drive. Everything seemed to be fine, but as a precaution he decided to drive it to work for the next couple of days. Good thing too, on day two he was driving along and it made some very bad and expensive sounding noises as it ceased to run. It was loaded on a flat bed truck and taken to the house. Turns out a rather nasty chip had worked its way partially through the engine and then locked the jackshaft, thereby stopping the water pump and distributor which explained why it quit running. It had also ruined the block. It was down to frantic sourcing and working, but it did make it to the VTR, but there was much extra expense and time spent all because of a bit of machining debri. |
| Steve Pike |
| Steve, If the machine shop does not get it clean, then how do you?? db |
| Doug Baker |
| I had my machining done by an engine specialist company. They machined my block, mostly boring of the cylinders and dipped the block. They dipped the block before the machining and then gave it a cleaning process after the machining.. not sure if it was re-dipped. When I got the block back they insisted that I clean it completely paying particular attention to the passages. I too asked.. How do I do that? Their response was soap and water... I seem to recall they said to use Tide laundry soap. After cleaning you're supposed to coat everything with 50 weight oil immediately because a skim of rust will form after water washing. I didn't do it that way. I used multiple cans of carb cleaner and ran the carb cleaner through the passages followed by the long skinny brush. The same goes for the crank.. the passages must be cleaned out. Oh and yes.. it was fun. I just hefted the block around by hand. It's not that heavy without the crank. I installed the crank while I had the block on a strong wood bench. My son and I then picked it up and bolted it back on the engine stand. Not a big deal and I think the strong wood bench was better suited for that job rather than installing the crank with the block on the stand. Henry |
| HP Henry Patterson |
| Doug, Pretty much how HP describes, lots of hot soapy water and long thin brushes. Then everything gets a good rinse. I like to then pour alcohol on iron blocks and heads through all the bits as it will mix with the rinse water to lower surface tension and aid in draining/drying. All the inside areas and passages qet a protective coating of oil. The mating surfaces are masked, exterior surfaces are given a quick solvent clean and then painted after the solvent flashes off. Then the masking comes off and the mating surfaces get a good solvent clean and an oil coat. |
| Steve Pike |
| Hello, Interesting topic. My questions are: where could you find tri-metal bearing? Is there particular brand? where they OE bearings? As my engine is low mileage and 32 years old, it will need only honing and new rings, bearings seals, etc. For rings I will go with the totalseal ones. Cheers, JGC |
| J. G. Catford |
| Hi JGC I got my bearings (and everything else, for that matter) from TRF, though you can get them from BPNW for too, and probably others. They come in a white box but say County brand somehwere on the packaging inside the box. I called to check and they assure me that County and King are one and the same and producing the bearings to original VP2 spec. If you want Vandervall (sp?) bearings they are still out there - there is a guy on the BritishCarForum.com classifieds (you will have to search the parts for sale section) who has some sizes in stock for TR6 - he wanted a lot more than I paid for the white box ones (by a factor of 5, as I recall) so I decided to go with TRF. Maybe that was a silly move on my part - only time will tell, I suppose. I really enjoyed the process of stripping the engine down, and I am looking forward to putting it all back together. The cost of doing it yourself instead of sending it off to a professional is not too bad - I reckon with all the bearings, rings, new camshaft, tappets, lifters, valves, guides, all new rockers, gaskets, seals, hardware etc. and even with the machine shop work I am still under $1500. Of course, the warranty I get is not worth the paper I could write it on! I would have hated to miss out on the experience, though - I have never taken an engine apart before, and if this thing runs when I finally get it back together you will hear the screams of delight in Canada! Cheers Alistair |
| A Hewitt |
| alistair Trust yourself, it will work. Do not forget, you also have the repair manual on the CD not to mention a little help from here. Just remember lots of assembly lube and glad to hear you had the cylinders de-glazed. My VP2 bearings came in a white box also from BPNW so you got the new real thing. Pretty well all suppliers have the VP2 (tri-metal bearings) equivalent now and Isreal is the only place they are made. IF I recall my searching a few years back, Country and King are the same. Expect to pay more for the tri-metals. Rick |
| Rick Crawford |
| Alistair-Just a couple thoughts on re-assembly. If the block was hot tanked, any of the original aluminum gallery plugs that were left in place may be dissolved. Also, there is a copper sealing washer under the head of the top bolt of the rear seal housing that can cause a leak if omitted. Berry Price |
| BTP Price |
| Thanks Alistair, I will look there. I rebuilt a B engine 10 years ago, my first one and everything was fine.. Best wishes to you all.. JGC |
| J. G. Catford |
| Here is two more should haves while assembling the engine: Run a bead of sealer along the left side of head gasket-I seem to have a slight chronic oil leak in that area. Also, wire brush the studs holding the head to the block and coat with an anti-seize compound. It will make the head much easier to remove next time. Berry Price |
| BTP Price |
| Hello, An extra question... I the process of replacing rings and seals and bearings etc. As the engine will be almost apart is there an advantage to polish piston to a mirror like finish like suggested for con-rods? Thanks, JGC |
| J. G. Catford |
| VERY BAD idea!!! |
| A R Christopher |
| Thanks AR, but could you elaborate a bit? Cheers, JGC |
| J. G. Catford |
| Okay, I'm an idiot. I took out the thrust washers without noting which way round they go. After a long break (forced by work) I finally got the block painted last night so hopefully I will be starting the reassembly shortly. One of the first jobs will be the thrust washers, and I am very confused. I know that one of the manuals shows them the wrong way round, but a search of the archives here has left me even more confused. I read a post last night that said something like "the grooves face away from each other, i.e. towards the crank". That's when I decided to go to bed. Can someone please give me a definitive answer?!? A couple of other questions have come up while I have been busy working... I have a bottle of Permatex "ultra slick assembly lube" which I plan to spread over everything that might move - bearings, crank faces (journals might be the proper word?), piston rings, rockers etc. Is there anywhere this shouldn't go? How much do I use? So it just coats or until it drips off? Should both sides of bearings be coated? Use Oil instead/in addition in places? I also have the white paste type cam lube for my shiny new camshaft, and I guess the tappets. Is this supposed to be used on the cam lobes or on the bearing surfaces too (I know there are no bearings, but you know what I mean). I bought new timing sprockets, chain and tensioner, though I read somewhere that the new replacement tensioners are nowhere near as good as the originals - any thoughts on this? What lube for the sprockets and chain? Looking at the new rings installation, the manual says to avoid a gap on the thrust side of the piston. You know what's coming here, right? Which is the thrust side of the piston? Front? Well, that's about all I have for now. I think we all need to post more - there was a rumour that one of the Canadians was defecting to another forum! Whatever next??? Cheers Alistair |
| A Hewitt |
| Alistair, The thrust washers have the grooved side facing the crankshaft webs. The plain side goes against the block. This side should also have the ID information (mfg., oversize, part number). Install the bearings into the block and rods dry. Only lube the main bearings just before installing the crank. Only lube the rod bearings just before putting the bearing cap on. If you oil the backside of the bearing, you greatly increase your risk of spinning a bearing later. One guy in our club had been doing that and kept wondering why his bearings always spun.... Using 'a lot' of assembly lube isn't necessary. You do want the surfaces completely covered though. Any excess will squeeze out when things get tightened up. I would not use assembly lube on the rings. Motor oil works just fine for that. Just make sure your piston/piston ring installer is well oiled before trying to install the pistons. Likewise the bores should be well lubed. I've seen people dip the pistons in a container of oil just before installation. But that gets a bit messy! By all means put cam lube on the cam lobes AND the flat face of the lifter. Use assembly lube on the cylindrical portion of the body. You want to make sure that the lifters spin easily. Putting heavy cam lube (grease) will slow/stop the rotation and the lifter won't bed properly to the cam. This leads to much shorter cam/lifter life. Follow the bedding in instructions from the cam manufacturer to the letter! Don't know about the quality of the new tensioners - sorry. Do use assembly lube or motor oil to lube the chain and sprockets. Thrust side of the pistons should be on the manifold side of the engine. Cheers, Tom |
| Tom Sotomayor |
| Alistair, Here are a few other points I forgot to make: Lube both halves of each bearing shell, but as mentioned before - NOT the backside that seats in the block or rod. Cleanliness is VITAL !! The Permatex lube is good stuff - that's what I use. Lube the crankshaft seals and their mating journals at assembly. I use a little (very little) silicone caulk to assist installing the seals in their housings. It makes them very slippery, but when cured it glues them in place. NEVER hammer on a seal directly. If you do it will distort and then it won't do it's job. Use a large block of (flat) wood between the seal and hammer. With the caulk you shouldn't have to though. Tom |
| Tom Sotomayor |
| Alistair, One more little thing... There are many little things in rebuilding an engine that people find out along the way that don't get communicated. Be careful of using rags with lint on the inside of your engine. I found out the hard way when I noticed pieces of lint in my journal's and was not happy. I talked to the engine build expert and he said... 'Oh.... you're not supposed to use cotton rags.. You're supposed to use the paper kind.' 'We get the "rags-in-a-box" from Home Depot'. I ended up having to clean out the lint. The problem with lint.. is if you get alot it could clog oil passages and/or clog up the screen on the oil pump. Also, When I rebuilt mine I found many engine buid websites that are very detailed in things like using assembly lube, how to determine the thrust side..etc.. They are generic discussions and apply to all engines. Of course keep asking the people on this web site. Henry |
| HP Henry Patterson |
| Thanks for the advice on the lubes and rags - I got a lint free cloth from Home Depot so I will see how that works. I am very busy with work and my family at the moment so the only progress I have made is to run a tap through all of the holes in the block - amazing how much crud collects in those threads! I just ordered a tap to fit the head stud holes (I am hoping that 7/16x20 bottoming tap is the right tap for the job...) and while I was there (McMaster Carr) I ordered a roll of fine emery cloth. I didn't get any mach8ine shop work done on the crank, and I thought I might try my hand at polishing the journals myself. Is this a really stupid idea? I can't feel any scratches with my finger nail, but I figure a little polishing wouldn't hurt. Any tips? Just leave it alone? Another thing that occurred to me as I was doing some cleaning to make sure all of the dirt was removed from the various bearing surfaces in the block - it is quite hard to get to the camshaft even with the crankshaft out. Is there any reason not to put the camshaft in first, allowing easier access to add lubricant, and also allowing the job to be done with the block on its end - it seems like having the camshaft vertical would be beneficial during the insertion? I haven't checked whether the front plate will go over the end of the camshaft, so it might not be possible, but it seemed like a good idea. One thing I am a bit concerned about is getting the distributor drive back in the correct orientation. Is there any way to mess this up? The distributor was rebuilt and the oil pump will be new, so there is no reference point I can think of... As ever, thanks in advance for any thoughts, tips, advice, warnings... Alistair |
| A Hewitt |
| I think your first estimate is correct, polishing the journals by hand would be a really, really stupid idea. The best way to check them is with a micrometer (don't use a carbide faced mike, it scrastches the journal.) You will be looking for undersize wear and ovalization of the journal. Al Christopher |
| A R Christopher |
| Al Thanks for the confirmation! I actually just opened the parcel from McMaster Carr, and I am surprised at how rough the emery cloth is. I looked at some engine rebuild sites (as someone recommended) and a few people seemed to be using emery cloth to polish the crank journals. They must have a different source, because the stuff I now have a 20 yard roll of is way too rough for the job. Oh well. I am sre it will come in handy for something! Cheers Alistair |
| A Hewitt |
| Alistair, I installed my cam before reinstalling the crank for the very reason you mentioned. It's easier to feed the cam in without banging the "bearing" surfaces because you can guide it in with your hands inside the block. I was able to get a good finger full of cam/assembly lube on each cam bearing surface from inside the block before inserting the cam. As I inserted the cam I kept smearing lube around the cam mating surfaces as it went in. As far as the distributor drive, The way I did it... I got the #1 cylinder on TDC of the firing event (valves closed) and I then installed the drive to line up with the marks (one mark on the drive and another on the block...I think. To verify that it was correct I simply put the ditributor in the number 1 firing position (rotor pointing toward the #1 plug wire socket on the cap) and then made sure the offset on the distributor drive shaft matched the offset slots on the drive gear. There might be an easier way but it works. Before you get to that point you still have to time the cam with the crank. That's another story but is not difficult. Henry |
| HP Henry Patterson |
| Alistair First off, I would not think it is a good idea to "hand polish" bearing surfaces. You will not get even pressure between your fingers. Hate to mention this to you but in the shop manual (on good 'ol CDII) is the procedure for timing the distributor (and cam) on an engine rebuild. The oil pump makes no difference when installed. Sounds like you are making good progress. Rick |
| Rick Crawford |
| I really did find websites suggesting using emery cloth to polish the crank journals - but having seen the finest cloth McMaster Carr offer, I have to assume the people who wrote the home-poishing websites were crazy. I imagined it would be the sort of grit level used to finish off a car's paint-job, but it is more like the stuff I use on the window frames of the house! So, no polishing for me. I have the manual on CD (I also have a copy of the Bentley, the BL and Haynes manuals in various places around the house!) and I am following it, but I assume other people are too and in my web-searches I have seen problems with things like the distributor drive, so I thought I would ask for advice - always better to hear from someone who has done it themselves without factory training! I finally got around to measuring the thrust washers I took out last night. They were only 0.001" smaller than the new STD size washers I bought to use with Scott's fancy washer. Strange, since I had 0.013" end float. I guess they have been replaced after some wear to the crank and/or block. I picked up a pack of plastigage and I think I understand how to use it and what the numbers represent. If the numbers I come up with are out of spec, though, what can I do about it? If too small I can't get smaller bearings than STD size, so I am stuck with grinding to an undersize and appropriately oversize bearings, and if too big I guess I am in the same boat? In other words I am using the plastigage to see if I need to stop the reassembly and grind the crankshaft? One more stupid question - let's say I set the end float to 0.007" with new thrust washers. Then when I fit the sprockets for the timing chain I have to set their alignment, but is that with the crankshaft forward or back? I can't see the acceptable alignment number for the sprockets at the moment, but I am sure it is under 0.007" since 0.004 and 0.006" shims are available. Of course, since I still haven't managed to get the woodruff key out this might not make any difference to me! I can feel a trip to the machine shop coming to sort that out. I think I will go and do a good clean up in the garage now in preparation for the reassembly to begin soon. of course, by the time I have time to do anything more than a clean up it wil need another clean... Thanks for all the help - sorry if I am asking stupid questions. I have started to daydream about how nice it will be to blast around with my newly rebuilt engine, and the thought of it not running well does not make me happy! Cheers Alistair |
| A Hewitt |
| Alistair, You're taking a good approach. Reading the manual and then asking questions is the way to do it. If you get stuck on something chances are I/we have been there... So keep asking. When I timed my cam to the crank and the distributor drive to the cam I read the manual and asked questions until I fully understood what was going on. When you buy a stock cam you don't get any instructions on how to time it to the crank and the Bently manual can be confusing on that so when you get there ask away. For bearing clearance I had the engine shop do it thier way... They measure the crank journals and pins and then they install the bearings in the block (without the crank) and then install the bearings in the big end of the rods (not installed on the crank pins). They torque all of the bolts holding the bearings to spec and then they measure the inside diameter of the assembled bearing assemblies. They then subtract the inside diameter measurements of the bearing assemblies from the crank journals and pins measurements to come up with the clearance. I remember our spec's are .001 to .003,... I think. Mine came out at the high end of .003.. That's probably why triumph specifies the use of 20W50 oil. Hope that made sense about the bearings. I know people have had success with plastigage.. I was just explaining another option. Good luck Henry |
| HP Henry Patterson |
| Some progress, and more questions... I now have the crankshaft in place (and a thrust washer on order from Scott Helms). Camshaft in the block (lobes practically smothered in cam lube). Front and rear engine plates in place, and tonight I finally put my first piston back into the engine. I staggered the ring gaps so they were the same as when they came out - I am hoping that there isn't some "special" requirement (other than the thrust face, which I avoided). Since my cylinders were just honed, not bored and I am using original pistons, the rings didn't need any grinding (at least for number one piston) - so that's an expensive tool I wish I hadn't bought! They came out at the top end of the allowable gaps which is a bit worrying, but I guess there isn't much I can do about it, other than buy oversize rings, I guess. Now I have the piston in the block, and I am a bit concerned about the scraping noise when I turn the crank - I used some oil on the cylinder wall, but not too much as the rings had grave warnings about using too much lubrication with new rings. I am pretty sure that the noise is down to the new rings on the honed walls, but can someone reassure me that there is usually a noise like that - the old ones in the shiny cylinders made no noise I could detect! The other question is about the camshaft end float. I have a new canshaft and a new keeper plate. The end float is supposed to be 0.004 to 0.008 inches. I get 0.010 inches. According to the manual, the remedy to excess end float is to get a new keeper plate. Well, I already have one. Try another? Or just accept that it is a couple of thousandths of an inch "looser" than it should be? Thanks in advance for any advice. I just convinced myself that I didn't triple check that the top ring was the right way up, so I guess I will be taking that one back out... Cheers Alistair |
| A Hewitt |
| It sounds like you are making good progress. Yep, new rings in a honed bore make a bit of noise. The purpose of the honing is to aid oil retention and to help the rings to seat (think "fine file"). The old ones didn't make much noise because they were worn smooth together. If you're worried about end gap, you can go to the next size up oversize rings. Those oversize rings will require gaping. Most replacement rings today come pre-gaped, and are a bit on the generous size as far as the gap goes. You can get "gapless" rings too - Total Seal makes them, I think. They are significantly more expensive though, IIRC. I don't think your cam endfloat is really a problem. In reality your cam will bias to either the front or back (depending on which way the cam lobes are tapered) and stay there. If it really bugs you though, the only solutions I see are to replace the cam with a new one, or have a custom retainer plate made of thicker material and have it ground to size. You could take your new one and the old one and have them both ground down. Using the pair you could sandwich a cut-to-shape shim in between and be able to adjust the endfloat at will to a gnats whisker. Tom |
| Tom Sotomayor |
This thread was discussed between 04/12/2007 and 11/02/2008
Triumph TR6 index