MG-Cars.com
Triumph TR6 dizzy drive BBS discussion at MG-Cars.net

MG-Cars.net
Welcome to our resource for MG Car Information.
Recommendations
Parts
TR parts and Triumph parts, TR bits, Triumph Car Spares and accessories are available for TR2, TR3, TR3A, TR4, TR4A, TR5, TR6, TR7, TR8, Spitfire and Stag and other TR models are available from British car spares and parts company LBCarCo.
Triumph TR6 - dizzy drive
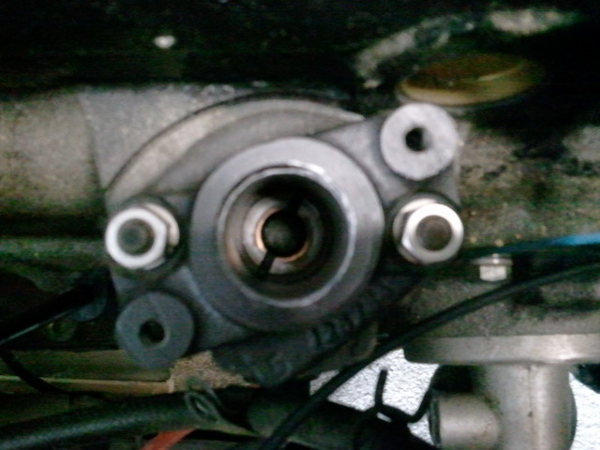
| Hello all, this is a question for Steve. As I've mentioned in previous posts I am improving the specs of my engine on the TR-6 with lots of goodies. Now I'm at the final stage where everything is done and the dizzy has to be installed and the engine started. I have put in the oil pump drive the way the manual says,i,e with the offset slots facing the block and fitted back the dizzy. No problem here, but upon trying to connect the ignition wires from the distributor cup to the spark plugs, I saw that the wires are do not correspond in length to their respective cylinders. The engine has been rebuilt before I bought the car. Is it possible that the mechanic has got the dizzy in at an 180 degrees wrong? If I install the distributor at a 180 degrees the other way, it will not go fully in, but the wires align. The engine before I started doing things to it, was slow, but was running O.K. My last question. Where should the rotor point at cyl. no.1 firing? Any thoughts please? |
| Kypros Christodoulides |
Like this
 |
| Don Kelly |
| The oil pump gear can be pointed any where. you can unbolt the housing and lift and rotate to any position as long as the the $1 plug wire lines up with the rotor. Are you sure you are at top dead center?? And not 180 out? |
| Don Kelly |
| They say confession is good for the soul, so time for a little true confession here that might explain what you're seeing. Many years ago I pulled a Lucas distibutor apart to work on it, made the changes, then reassembled. When I went to install, the only way it would go in and seat was at 180 degrees out. After making various suppositions on the ancestery of and accusing the distributor of having an Oedipus complex (but not in those words if you know what I mean), it dawned on me what I had done. On reassembling the distributor, I had installed the drive dog 180 degrees out. |
| SteveP1 |
| Hello guys and thank you for your great help. From the image Don has provided, I see that the way I have installed the distributor drive is one tooth out. The position I have placed it I found in a downloadable manual and showed that the offset slots should be in direct line with the 2 dizzy retaining sscrew holes. The manual I used is the second edition by The Triumph factory. I am sure that the engine is at TDC as the pointer is at TDC, no1 piston on top and both no1 valves fully closed, i,e cylinder no1 ready to fire. When I dismantled the distributor I made sure that the drive dog was put back in correctly. Today I will start it and let you know. Thanks again for your valuable comments. |
| Kypros Christodoulides |
| I was trying all day without any success. I tried every conceivable way. I had spark, I had petrol but absolutely nothing. Then I tried a compression test and to my amazement I had very little. From 50 psi to 70tops. I wonder what I did wrong. Head gasket new, torqued 108NM, surfaces clean and true, tag in the back of the gasket, I don't know what could have happened. Another thing I noticed is that the dizzy drive if put according to the manual the rotor point 180degrees wrong I think. Anyone can tell me which is no1 cyl. at the distributor cup please. Any help will really be appreciated. I am really frustrated right now and thinking to set the thing alight. Thanks. |
| Kypros Christodoulides |
| Bad news , can't remember what you did but sounds like you got valves that are open . Any chance you snapped the keyway at the crank. Last fall I helped a friend who had done it on his spit. He could figure out what was wrong until he noticed his carbs where pushing air instead of sucking |
| Don Kelly |
| No Don I'm sure the valves are closing properly. If they didn't there wouldn't be any lash in them and they could not be adjusted. The valve geometry is spot on at 0.85 distance between coils. I have shaved the head quite a bit and my fear was the head studs were going to bottom out, but by a visual check they seemed all right. I've taken the rockers out and undone the head nuts. I'm going to put some washers and torque again,in case the gasket compresses that much that the nuts bottom out. I hope it will solve the compression problem otherwise I'll have to pull the head out and investigate further. The keyway seems fine. |
| Kypros Christodoulides |
| Actually not so sure, if the key breaks some time it will jam the damper in a different position. Exactly like my friend spit That's why it was so tough to diagnose |
| Don Kelly |
| Hi Kypros I attach a picture of my distributor arrangment and my finger is pointing to the number one cylinder. Hope it helps. I trust you have adjusted the valve and rocker arm clearance to 0.01 inch as per the manual. Did you do the piston rings as well? Did you offset the rings to make sure the ring gaps are not lined up on the 3 rings? 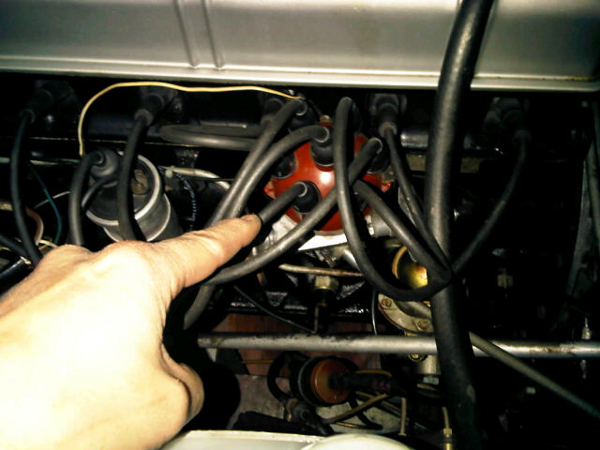 |
| Michael Petryschuk |
| Thank you for the picture Michael, I figured as much about cyl. no.1. When I bring cyl. no.1 at TDC, with the offset slot of the oil pump drive towards the engine, the distributor will only align 180degrees the wrong way. In order to align the dizzy at cyl.no1, I have to install the offset gear 180degrees the other way. the piston rings I did not touch, the valve lash is spot on. When I installed the cam, I made sure that it went the right way in, as I aligned all the pointers correctly and it also looks correct because when it is at TDC the damper pointer is at TDC no.1 valves are fully closed with no1 piston on top. |
| Kypros Christodoulides |
| Doesn't seem right. I am dumbfounded. I guess before you pull the head off again make sure your compression tester is working properly. You might want to try a leak down tester. These devices blow air into the cylinder when the valves are supposed to be closed (TDC) and if the pressure drop is too high that indicates a problem. Then you listen where the air is leaking to. exhaust pipe- you have a exhaust valve leak Carburetors- you have an intake valve leak Crankcase- piston rings or piston or head gasket. |
| Michael Petryschuk |
| Thank you Michael, a leak down test seems the logical test to do, but before I will shim the head studs in case they are stretching and don't press the head down to the required torque.If the dizzy gear will only align in the reverse position, I think I will leave it in the 180degree wrong position to have the correct firing order and take it from there. But really I don't understand it. Head milled and straight, cam. installed by the book,head torqued to 108.3NM,engine turns, rocker gear follows, spark, fuel delivery O.K, yet no compression. |
| Kypros Christodoulides |
| Kypros, Quick question, what cam did you install? I put a 270 profile cam in from BPNW several years ago, and the process was quite differenent than the stock install. Might this be the issue? Rod |
| Rod Nichols |
| Hi Rod, I have installed a regrind from TSI, duration 282degrees. Their S2 cam.Because it's a regrind,it had the mark to put it on to the cam gear and this is what the seller instructed me to do. After that, it was a case of aligning to the marks. |
| Kypros Christodoulides |
| Hi all, Today I have have added shims to the head studs to make sure that there is enough thread to torque the head down,(although I have measured the thread before and it was enough) but it wasn't this as the compression is still very low at 50psi. Tomorrow I am pulling the head out to investigate further. Regards to everyone. |
| Kypros Christodoulides |
| It may be too obvious but you didn't forget to put the gasket on did you Kypros? Good luck - I hope the problem reveals itself quickly. |
| Michael Petryschuk |
| Well here it comes guys. I took the head out and took it to the machine shop today for crack testing. It came out perfect. No leakage there. Then the mechanic there came to my house and checked the block for straightness. That was found dead straight too. By the process of elimination, we concluded that the head gasket was the culprit. I ordered it from Rimmer bros.part number GEG387. Now I have ordered the more expensive Payen head gasket and I hope this will cure the compression problem. The bad thing though being that while I was cranking the engine, the water found its way to the oil, so now I'll have to drain the oil and start with fresh oil and filter. |
| Kypros Christodoulides |
| Kypros, time to ask the question I've been holding off on until there was more information. Did you install the gasket "dry?" |
| SteveP1 |
| Yes Steve, I never put any sealing medium and it's the first time this has happened to me. |
| Kypros Christodoulides |
| We don't use a gasket sealant, but we don't put them on dry either. We give them a quick spray with silver paint to get a thin coat on both sides, then install and torque down while the paint is still "tacky." |
| SteveP1 |
| Any chance you used the wrong head gasket for the type of block? Berry |
| BTP Price |
| I have compared the new gasket with the original one I took out and they are the same. spraying the gasket with silver paint does make sense,but I don't think this alone would have solved the low compression issue, also as I work alone, by the time I put the head back on the paint would not be tacky any more. One confession I have to make though, is that I cleaned the block surface with a stanley blade but didn't sand it down to get a polished finish. This time however I did it with a straight block and sandpaper (studs out) and got a clean finish. Today I'm draining the oil and replacing with a new filter. Problem in Cyprus being very difficult to find 20/50 oil for old engines. The only available 20/50 is with a lot of detergents and no ZDDP added. Yesterday I was impressed at the machine shop how they crack tested the head with all waterways blocked,pumping 6 bars compressed air into it,inside a hot water tank. No leaks I'm relieved to say. Thank you guys for all your help, I'll keep you posted. |
| Kypros Christodoulides |
| Kypros-The reason I mentioned the head gasket is that there are 2 types. You mentioned in an earlier post that the gasket had a tab and the Rimmer part# was GEG387. That gasket goes with the later blocks that have a recess around the cylinders. If you have an earlier block lacks the recesses or the recesses have been removed by machining, using the gasket with the tab will cause leakage. If you have Roger William's book on Tr6 restoration, a better explanation is found on page 83. I thought it might be the cause the leakage. Berry |
| BTP Price |
| Hi BTP, mine is a 1976 TR-6 and indeed the cylinders have a recess around them so I guess part no. GEG387 is the right head gasket.This gasket has a tag at the bulkhead side of the engine and so does the block. This gasket also is the same as the one the engine came with. It did cross my mind that I might have ordered the wrong gasket after your suggestion in an earlier post. Thank you and best regards. |
| Kypros Christodoulides |
| Ok,that eliminates one possible suspect. Berry |
| BTP Price |
| Keep us posted, the suspense is killing us! |
| Don Kelly |
| Hi all and Don, I'll be keeping you posted as soon as there is news. Today I have removed the cam. followers, cleaned them from water, put assy.lube on them, also dropped some on the cam lobes and re-installed them. The bad thing though is 3 of them have light scores,I'll reuse them though as they are brand new. The gasket is definitely the right one.I've ordered new studs,washers and nuts in case they are stretching and the new payen gasket will be arriving tomorrow.The deck surface is spotless now and ready to fit the new gasket. The bloke from the machine shop after checking everything suggested that the gasket was a faulty one and he is in all probability right. Has anyone ever had the same thing happening to him? I'd like to know, otherwise I think I'm the most unlucky person. Please wish me luck with the 3, 40 DCOE2 weber carbs on e-bay I'm biding on. They are the last item I need to finish the job. |
| Kypros Christodoulides |
| The payen gasket arrived today and it's clearly an improvement over the standard item. It even has an adhesive coating to improve sealing. I'll be installing it tomorrow and let you guys know. So far I have drained the oil and replaced the filter. The sludge that came out almost made me cry as it was full of water. I have flushed the engine with fresh oil which I also drained and coated the cam followers and cam lobes with assy. lube. I'm keeping my fingers crossed. I'll torque the head and do a compression test before I start putting everything back together for the third time. |
| Kypros Christodoulides |
This thread was discussed between 28/04/2012 and 11/05/2012
Triumph TR6 index